April this year gave us hope we were asked to do the chill out room for a big organiser in Liverpool. This would be for Psychometric Vision and their night Soma Sonic a huge dance event with in Liverpool and would be paid quite well for the work.
The organisers sorted out a transit van for us and came to pick up the rig the day before. Me and Rick went with them behind in the car. When we got there it was planned to be in a large and very old factory in the city centre. The room we were using was on the very top floor and was extremely difficult to move the huge cabinets up to the forth floor as the staircases were very narrow.
Once in place we began to set up the sound system and run it in. This was a good idea at the time but the owner of the building came up to see what we were doing and unfortunately dust was coming down from the ceiling. Straight away we stopped the rig and had to re-think the placement of the system. The problem had been that the organiser knew we had a sound system but didn't ask about the size of it. We then had to relocate to the floor beneath where we were. This wasn't a problem but was quite hard work to then move every thing all over again.
Once the rig was in place Rick chose to stay at the venue over night while I went back home for a good nights sleep as i knew from previous experiance that the event would be all night and hard work.
The next day when we arrived we started to help put up the decoration in the room we were using and ran the sound system to warm the drivers. By 9pm when the doors opened to the public every thing was ready and sounding great.
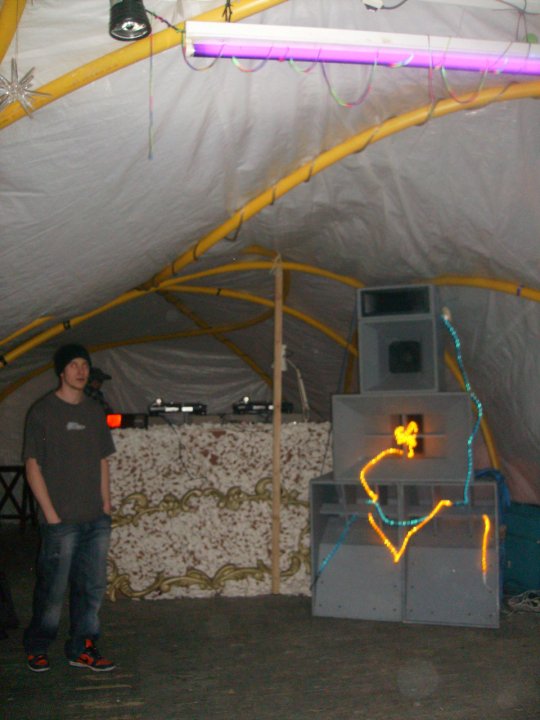
I stayed with the sound system through out the night and we had updates and the amount of people coming in at one point we reached 3,000 and had to stop entry. I also lost some of the DJs slotted to our room and had to go and hunt for other people to play. Due to the type of event that was going on this was quite normal all be it stressful for me. Here is one of the pictures of the decor and rig.
You can see the sound system just in the corner.
The night was a great success we really enjoyed every part of it. The most annoying thing about it was that when we were packed up and ready to leave by 11am our transport was no where to be seen and uncontactable. This was hard we were tired and just wanted to load the van get home unload and go to bed. We were kindly given cups of tea and bacon butties from the organisers and continued our wait.
At 5pm the van finally turned up and Rick came and got me from my car where i'd gone to have a nap. Loaded up and ready to go we journeyed home to bed.
The night was a fantastic experiance but in the future we will organise our own transport so that we dont have to rely on others who may not turn up on time.
Sunday, 13 May 2012
Boredom
Over the next couple of weeks we didn't have any more contact from gig nights. Some times over the the winter period the under ground music scene takes a back seat especially in the North West area. During this time me and Rick did small house parties with smaller sections of the sound system mainly the kick bin and the mid-top. These worked well but weren't paid although we had fun and were able to test the sound system. The comments from the new speaker section were good and we enjoyed the feedback and the enjoyment the sound system was creating.
The new speaker
Whilst we were building the new cabinet we chose to put on another night in our local this would give us some savings ready for van hire or if any more equipment broke.
This night went really well and we only put it on with a weeks promotion time. By now we have established a good night that every one seems to enjoy in our local area and we are making a small amount of money in the process.
The new speaker also went down really well giving us the best sound possible.
New speaker
While we were painting we also decided that we needed to change the way the mid and high top speakers were positioned. The comments we had received during the nights we had done were that the high end needed to be louder and clearer.
The driver housed in the kick bin we had found was also very good for mid frequencies and so we ordered another one the same to put into a new cabinets. We then started researching the different boxes that we could make. We also decided that the horn flare and compression driver needed to be updated and included in the midrange cabinet.
We decided to place the speaker in a cabinet with a front baffle and grate over the driver to protect it we then put port holes in the bottom of the speaker and placed the horn at the top. This was made in the the same way as the previous speaker cabinets. We had to make sure that the two speakers were completely sealed from each other and we also placed a filter in the compression driver. The metal grate on the front was bought from B and Q and we went into the local college to have the edges bent to fit round the box.
This is a picture from the next Wheatshef night unfortunately the pictures of the making of the id top cabinet were deleted by accident.
While we were testing the new box the crossover that we have had since the start packed up. Yet another piece to redo. We chose to buy an Alto X40 4 way mono crossover. This again came from Blue Aran.
Experiments
During the next couple of weeks we decided that the sound system needed to be painted in a different typer of paint. The colour would stay the same but we needed to find a different type of paint to use. The primer that we had originally painted the cabinets with had become scuffed and marked and so began researching different paint types.
The vinyl paint that many people use on speaker cabinets is far too expensive for us to use until a brain wave came to Rick and he suggest vinyl floor paint. We bought four litres over the internet from a large vinyl company and when it arrived the massive task of re-painting began.
Because the paint is rather thick and potent we needed to paint each one outside. The mammoth task of unloading each driver removing the black bolts and commencing painting began. This in total took us three weeks to complete. Each speaker needed two thick coats and couldn't be moved or touched until the layers were dry. There were some mornings where my dad would get up to go to work and id be sat inside one of the cabinets painting. This was again another long task of 4-6 hours a day.
Liverpool
So the day started at 11. Me Rick and Mark our driver went to pick up the van and load the sound system. We were expected to be in Liverpool by 8pm ready to start the night at 10 so we had some time to relax before driving there at 6pm.
I wasn't in the van on the way but we went in convoy with me leading down the motorway. Reaching the venue just on time even though we did get lost a couple of times. The first snag that we did have was that the venue was in the city centre of Liverpool making parking slightly difficult. We had to pull up on the curb and while one person stayed with the van and equipment the guys took up the speakers as quick as possible. After 8pm we would be able to leave the van across the road down a side street until the morning. This was the same as the car.
We moved the rig into place and began connecting up the cables. The normal nights that we have run the DJs we have used have been able to work with out a monitor speaker. Due to being in a bigger venue the acts that were playing weren't are DJs and wanted a monitor speaker which was quite understandable. Luckily we were able to borrow a small speaker and amplifier and hook this up to our crossover.
The venue we were working at was a big warehouse about a car park. Inside the venue the organisers had created a massive tent structure which looked amazing.
The night began just on time due to some of the DJs being slightly late and was to continue until 8am. This for us wasn't a problem but was incredibly had to stay awake and with the sound system though out the night. Every one was having a great time and the door had taken a lot of money. By 2am the doors were officially closed and we could relax a little bit.
The night was a success and every one enjoyed it but i gave up at 4am and went to sleep in the back of the car.
Standard speaker shot.
By 8am we were ready to leave, we asked the DJ to play his final tune and we started packing away the rig and putting it back on the van. We had to drive home unload and drop the van off after no sleep!!
Every thing went smoothly and we got the van back ready to have some food and a well deserved nap. The night had been a great experience for us and also a fantastic earner now we could look at changing some of the speakers and re-paint the cabinets.
Job well done.
Back to the Wheatshef
The rig set up
Getting the party started
Speaker view
The standard speaker snap shot
Back to the Weatsheaf a night not too dissimilar to the last one but is going to go on for longer. i am going to charge £3 on the door to cover costs last one was a fairly expensive night for me, But O well.
Back to the Weatsheaf! DUB / DRUM AND BASS / Jungal / Dubstep Univibe Hifi Dj Tycaine Relentless bro Sci Levels Problem Child Koop A night of friendly vibes And FAT BEATS! Friday 2nd March £3.00 on the door. 8-1.45am TOTUMEL>ICK 4k Sound System Sound m8tys c you there Rick X The flyer above is for the night we were about to commence. We began packing up the sound system ready to go. This time we had the horse box to take every thing there and the van we were using to take up the sound system to Liverpool would be taking it from the pub there the next day. We moved the sound system to another corner of the room we were using once we got to the pub. This was due to using two sets of decks this time instead of one and we needed more room. We had also stated this time that we would be charging £3 on the door and so during the night me and rick would take it in turns to look after the rig and man the door between us. The DJs arrived the rig was set up and so we began our second night that would hopefully make us even cash to cover the room hire and the van costs for the next day. They came they partied, they spent loads of money and they had a fantastic night. No trouble. No problems and we made enough to cover what we set out to do happy days! We packed up ready to move every thing the next and i took the rack unit now housed in its new box home for a well deserved rest before doing it all over again the next day. |
Round two
When we picked up the equipment the next day we had decided that we needed to organise another night as soon as we could.
The succession of our very first night was amazing. Every thing seemed to go so smoothly. There was no trouble or problems with equipment. So with pubs permission we chose a date in march Friday the 2nd and so we would wait and just play music for our own enjoyment.
We didn't have to wait for long though before people had started to hear about our sound system. While planning the DJs for our own event i received a phone call from a friend involved in the underground music scene in liverpool asking if we would be available to take to the sound system up to their night for payment. Exciting was even a word the news was brilliant and we excepted straight away. The only thing that we needed to do was to build a rack case to fit the amplifiers and crossover in securely and to find transport. The night was booked for the Saturday after our own event so the weekend would be pretty hectic!
So transport.
We decided to ask friends that we knew if they had a van we could use or if they could drive one for us. I contacted various hire companies with in our area to find out the minimum age and cost of a transit van. Unfortunately both me an Rick would be unable to hire and drive a van for the event. A friend of our however, would be so we chose that option instead and booked a van from the Saturday morning to Sunday afternoon. All the cabinets would go up in the van and the rack unit and any fragile parts would come up in the car will me along with some trusty helpers for the heavy lifting.
Above is the flyer designed by Rick ready for the next night.
The research and co-ordination took roughly 2 hours per day for a week.
Saturday, 12 May 2012
The Bass Takes Over
The morning of the 29th and i have been logged into Facebook for the entire morning inviting people and seeing what the general vibe of the evening will be.
So far we have a really good Dub DJ set that we would like to end the evening on. These are two of our very close friend who have travelled down from Leeds to support us.
Matty Dread and Mr Dubbington
The first set is a fantastic Drum and Bass DJ that we have also know for years Mr Andy bekett spinning the decks with a mixture of DnB and Dubstep.
Bass Rapist
The second set is yet yet to be decided at this moment but hopefully on the night we will pull it off.
The sound system has been packed up and ready to and we are waiting for five o'clock when we can finally move all the gear in ready to kick off at 7.
4 O'CLOCK
WE have loaded the first two speakers into both cars ready to do the first trip. Rick is at the pub ready with a couple of our loyal helpers set for some very heavy lifting. At this end i've got my dad, brother and me putting each load into the car.
Its not an easy journey in a tiny little Saxo with a huge, heavy speaker!
By 5.15 we're in and ready to set up hopefully we will have a good hour to run the rig in before the decks start its first gruelling night.
At 7 we are good to go every thing is falling into place the only mistake we have made so far has been the need to get at sort notice a more heavy duty longer extension cable. With the power we have running we have taken steps to ensure that the amplifiers are separated into two different plug sockets just to be on the safe running from different extension cables.
As soon as we begin people start coming though the door. Most friends we have both known for years which is amazing that people want to come out and see us and also enjoy some different in our small town.
At eight o'clock we have a DJ ready to take the empty slot at 8.45 this is a Drum and Bass king in the Chester area and also a very close friend of ours.
sLiMe
We are doing so well for our first we have almost tripled the room price in first two hours. Every one is really enjoying themselves and me and Rick finally get to have a well deserved drink!
The view from the speakers!
Me on the speakers!
When it was time to get rid of every one people just wanted more! In the end we let the music carry on until the manager came and asked us politely to shut down. We were both on top of the world every one was so happy and excited and kept patting us on the back as a job well done.
We packed every thing away and left the speakers in the pub over night taking the amplifiers home with us just incase. In the morning we have a horse box coming to transport every thing back to its rightful home.
Organisation
Now that the sound system was built and ready to go we couldn't have all the fun ourselves!
Friends and family and people who longed to see our hard work needed a treat!
So we decided that we needed to organise a night in our local town.
So while its Christmas and the students are back we chose a pub called the Weatshef to host it in.
Rick went and spoke to the manager and arranged the 29th of Decemeber very close to new years eve but hey we know the Sandbach massive will turn out in force!
We chose to ask for £2 entry although the facebook says its free the pub did cost us to hire. Now that its less than a week away we've put out the word via friends and up in the pub its self and also advertised on Facebook.
Now we have the transport to organise which will it looks like will be the back of my car and Ricks mums.
Cables and every thing checked were ready to go.
Amplification
Now that the speakers were ready to roll we now need to think about the running of them.
So we decided to use two 1000W amplifiers bridged, a 800W amplifier to connect to the mid section and a 500W amplifier for the top section. We also used a four way mono crossover unit from Behringer.
Each amplifier has been bough second hand however, they have all been used only a couple of times.
Once we had hooked up the rig we were ready to go with its final testing!
The only adjustments that we found were working the crossover and making the frequencies right for each section.
This was a blissful 5 hours of play time!
Birthday/Christmas maybe?
The patient wait paid off!
The hard work nearly done!
The drivers had finally arrived!!!
During the weeks that we had been building the speakers we had made more orders for drivers and while the company were getting ready to send them out they had sent smaller deliveries of other orders we had made. Connectors, cabling and various other extra bits.
The speakon cables we had decided would be easier to make ourselves so that we could chose the length and how many we wanted. These were now ready to go.
So two beautiful 18" PD drivers arrived, a stunning 15" PD driver, an amazing second 15" PD driver for the mid and the compression driver and new horn flare.
We began with the 18" carefully placing the baffle tape around the edge of the baffle and selecting the correct screws to secure the drivers in place.
Next the 15" with the same careful consideration and so on.
The difficulty came with the compression driver and horn flare. In the end we chose to make a new bos to house this in as the old just didnt fit the new compression driver in.
The first amazing new 18" loaded and ready to go!
The fantastic 15" loaded and ready to blast away!
This process took us 4 hours to complete.
Paint
Now that the speakers had arrived in their new home we could begin the long process of sanding and painting all the cabinets. Firstly we had to sand each box down so that each box was smooth enough to paint. This also meant that we had to use more car filler on each box where the screws and joins were and then sand the sections that had been filled.
Car filler comes in a metal tin which has to be mixed with a hardening gel and then spread onto the area in which you want to use it. As explained previously this has to be done quite quickly as it dries rather fast. The other issue that we found whilst using car filler is that area in which you are using it must be ventilated the product is very potent and leaves you feeling light headed so extreme caution must be used. Luckily as we were working in a garage we could open the doors and also work outside.
The sanding and filling of each speaker alone took us nearly a week of quite intense work. While Rick was at his job during the day i would work on the speakers and while i was at work in the evening he work on the speakers. All in all hard graft for at least 6-8 hours a day each.
The same process was taken while painting the speakers. We used a grey primer from a builders merchants to paint each speaker. It gave us a matt grainy finish which we were looking for. Each speaker took two to three layers to coat which again took us another week of hard work.
The cabinets painted up and awaiting the drivers.
Family effort
During the next couple of weeks we started to have our first few problems.
The first of which being space. The speakers now consisted of three quite large and heavy boxes all of which once worked on had to be stacked in a corner of Ricks mums kitchen. Not exactly the most ideal place to have quite large and loud pieces of equipment.
A new place for storage and workshop had to be found. Which became my dads garage. Here we could work on the speakers any time we liked, it was out in the countryside so no possibility of upsetting our neighbours and there was loads of space to spread out and work.
This is where we hit our second and possible third problem.
We had to transport the speakers to the new location. As we had been busy wandering off to get smaller pieces of a bigger thing we had forgotten exactly how big the system had got. Not exactly easy to fit in the back of car. So between me, my dad and Ricks mum Anne we each put a speaker in our cars with the seats down.
But here lies the next issue.
The speakers so far hadn't had any design concept incorporating handling or more importantly handles! So once settled in their new home which was easier said than done we routed and sanded handles into the sides of each one making it easier to move.
This took four hours to move each speaker and various building tools.
Now for the colour!
Mid top creation
The mid section of the sound system was also created using the same methods as the previous speakers but as the fold in the speaker is quite harsh we filled the corners quite heavily with the car filler as mentioned before. Setting in the plastic horn flare for the high top. This process took about a week of tone to two hour sessions. It was also at this point that we chose to re-paint the sound system a grey colour. The reason for this was as many people had started to see what we were working on the above two speakers were painted in primer which is a grey colour ready to re-paint during this time some of our friends commented that it looked like sound was coming from breeze blocks normally associated with building. We also liked the idea and it seemed far more original than the usual black we have seen every where. Here was born the Grey and the first name choice ToTuMeLiCk system. Combining me and Rick to the product.
Kick bin
Work then began with the new Kick bin. The design as far as i am aware has not been seen before the idea behind this has been the types of events we would be holding and taking the equipment to. Mainly being Drum and Bass. Whilst we have been on our adventures we both decided there was just some thing missing slightly from the bass end of this genre of music. Many sound systems that we have both witnessed took on board the main fundamentals of sound reinforcement but we both decided that the lower end could be increased slightly using the low to mid range. Producing the over all "kick" sound to the type of dance music we listen to.
The flare of the speaker concentrating on the middle section of the driver. We believed that this would work and as the speaker would be placed at chest height of the average person it would produce the kick sound in the mid-low range at the right point between high and low and also propel the sound to its maximum having a fantastic result for the type of music played.
The construction of the kick bin followed similar lines as the bass in. Created and building the main structure again using the same products as before.
The clamps hold the main structure of the speaker together while the glue sets. Due to the shape of the structure this speaker was one of the hardest and longest cabinets to build.
As shown in the picture above you can see the angle in which the flare is structured. If you look closely at the first picture you can see the routed sections ready to put in the side panels of the speaker.
Here is a close up of the support structure and fold.
Here is the baffle and back section the kick bin.
This speaker will house a 15" PD driver 600W 4 ohm. For this driver we had to contact Blue Aran directly as the driver is not in stock and must be custom made and sent directly. We were advised that this could take up to three weeks.
The kick bin took roughly two weeks to make and finish including sanding and filling.
Bass bin two
We then started work on the second bass bin. This took roughly two weeks of roughly 2 to 3 hours in the evening and glue drying time to complete. We also chose to paint the first two speakers black on the outer part and inside horn and white for the structure and panel.
Connect
So the speaker now built we need to place the sockets in ready for the driver. To do this we used a larger drill the size of the socket created a hole for the two speakon sockets to sit in. Once the sockets were in place we then fixed them using very small screws.
Now that the main cabinet and inner sections were placed and secure we could then work on the outer part of the box. Where the screw sections of the box could be seen and also the edges of the cabinets were slightly even from the original cutting. We then chose to sand the entire box. This took a considerable amount of time using and electric sander.
We then also discovered that the screw sections might need to be filled. Due to the nature of the cabinets use we would need some thing strong to cope with amount of sanding and pressure. We chose to use car body filler. This HAS to be used with caution it is very potent and very sticky and must be used quickly and correctly. So the screw marks were filled in and sanded down. Not a bad job!
The first of many is now ready for the driver.
This process took four hours.
Glue
Once the box cabinet had dried we were then able to continue with the build. For us the excitement of our creation was being to build. It was extremely important that we made sure each section that had been glued with in the box was completely dry before adding to the structure.
Once the outer box was ready being the length side section which will be the top of the speaker when in use, the back of the speaker and the two side sections. From the top side of the speaker we could then construct the horn section, baffle and structure to the box. To slot in these parts of the speaker sections we then had to rout out the places with which the sections yet to be placed were to go. Both on the top section of the speaker and the bottom slightly like a jigsaw. This has to be carefully planned and placed which takes a lot of precision if the areas are not lined up correctly then this makes the whole sections useless. The inner sections of the speaker are then put in place and glued once dry and correct the top section of the speaker can then be put in place. We had to make sure all areas of the flare are smooth and there are no gaps in the fold. Using glue and filler this ensures no gaps.
Once this process has been carried the top section of the speaker can then be put on top. This is a job of lining up correctly and knocking the top section on the speaker once this has been lined up.
On our design the very front section of the bass bin in the access section to the driver this is where we can then fix the connectors in securely and then load the driver in. This section is held in place using black M8 allan key bolts and winged T-nuts to screw the bolts in place. We have screwed through the wood the make sure that the bolts fix on securely but then also routed out the hole of the bolt so that the bolts sink into the wood making it more secure and also look more professional.
Once these sections had been put in place we had to wait again until the sections worked on were dry enough to continue. The over all time spent on the inner sections of the bass bin added to 2 hours.
Stage Two
During the next two months we saved like crazy to embark on the plan in the cooking pot. Both armed with part time jobs and little social lives any money we had went into the pot.
By august we had just over £1000 to begin the journey. The next step was to look at the products available to us. This began with the speaker drivers we wished to purchase.
On the various sites that we had researched the named product that had been highly recommended was Precision Device or PDs known to speaker builders. This also created another problem.
To get the types of equipment we were interested in as well as the correct types of connectors with fast and secure delivery for expensive and fragile pieces we needed to use a well established company. This took some time. We spent a few weeks going to various club nights and outings looking a other speaker systems and asking other companies and people who they chose to buy their products from. The answer appeared to us to be a company known as Blue Aran. So we began with our first order.
The first products were PD186 700W 18"driver 8ohm of which we purchased two. These would be the bass section of the speaker system. We then also purchased a PD153ER 400W 15" driver 8 ohm which would begin our kick bin or mid section depending on the quality. We also bought the correct connectors for the speakers being Neutrik speakon connectors.
While in wait for the items we had bought in our first order we began the first build, being the bass bin. We chose to base the design on the speakerplans.com 1850 folded horn the difference in our design is that the front panel of the horn fold is the section where we load in the driver and the baffle being directly behind the fold. This makes our horn length slightly shorter but the horn width wider. This change for us made the design slightly easier and cheaper to construct.
We chose to build the speaker box from marine plywood which we chose to buy from B and Q the reason for doing this as there are companies and builders merchants that would be able to supply us with cheaper products is that B and Q have the ability to cut the wood in the store to our description. This would make our lives slightly easier in terms of firstly fitting a very large and heavy piece of wood in the car to get home. But also using the industrial cutting machine on site in the store meant that the edges were smoother than they would be using home tools.
The next section to complete is the construction of the bass bin which we began with constructing the box to then place the horn sections in and baffle. We used small nails and screws to fix the box together . Once these were in place we could then fill in the gaps with industrial wood glue.
These sections must be left to dry before we can continue with the inner sections of the cabinet.
This time span with ordering, measurements and building took roughly two weeks with a time span of roughly two hours per evening.
The Beginning
The First Stages
When we began designing speaker cabinets the first parts that we worked on began as a hobby. The first cabinets were basic boxes in which we bought second hand drivers from various sites across the internet, loaded them into the box and played stupidly loud music through them in Ricks mums kitchen. It was fun inexpensive and got us out of mischief and away from spending money in the pub. This began in February 2011 and after two months of various tinkering, loud music and our keen buddies watching over us it dawned on us both that we might be on to some thing.
Money saving began, hard working penny crunching you name it we put it aside. The amount to even contemplate spending on the electronics side above the 1000watt amplifier Rick already had was huge. The first amplifiers we researched were top of the range Crown digital amplifiers which were the ultimate goal but obviously out of reach. Instead we chose to concentrate on the types of speaker we would like to build and how we would like them to perform.
Firstly we chose to look at a four way mono speaker system consisting of bass bin, kick bin, mid-top and horn flare. The initial idea being to create sound reinforcement for small venues for example the local pubs in our area and house parties. This would mainly be for D.J.s as we both had the same interest and hobby to create small parties for friends. The idea behind building the first set of speakers wasn't to get any type of financial gain but to learn from our own experiments and challenge us as well as to have fun along the way and make more contacts.
The research and saving began looking at various speaker designs and different products to create them with as well. We used a website called Speakerplans.com to find some of the first plans that we wanted to create. The 1850 horn plan on speakerplans.com jumped out at us however, this was not the plan we wanted to follow. We chose that basis of design to begin with but later this would have variations of our own. At this point we wanted to create two of these designs and then go on the build the mid and top sections. These designs were fairly simple basing on the MT 102 designs with out the horn flare added into the speaker its self. The horn flare the high frequencies would consist of a compression driver and horn flare included in a box casing.
The amplifiers needed to power the system would need to be carefully researched and found possibly second. The need to save costs at this point in design was over looked by us in terms of the power wanted and needed for the sound system meaning that we chose to sacrifice purchasing brand new shop bought amplifiers and look instead at favours, forums, ebay and friends.
Subscribe to:
Posts (Atom)